On this page, we explain the role of front-end technology in responsive web-applications.
We cover JavaScript, Ionic and Angular (TypeScript), as being different approaches to making up screens.
Contents:
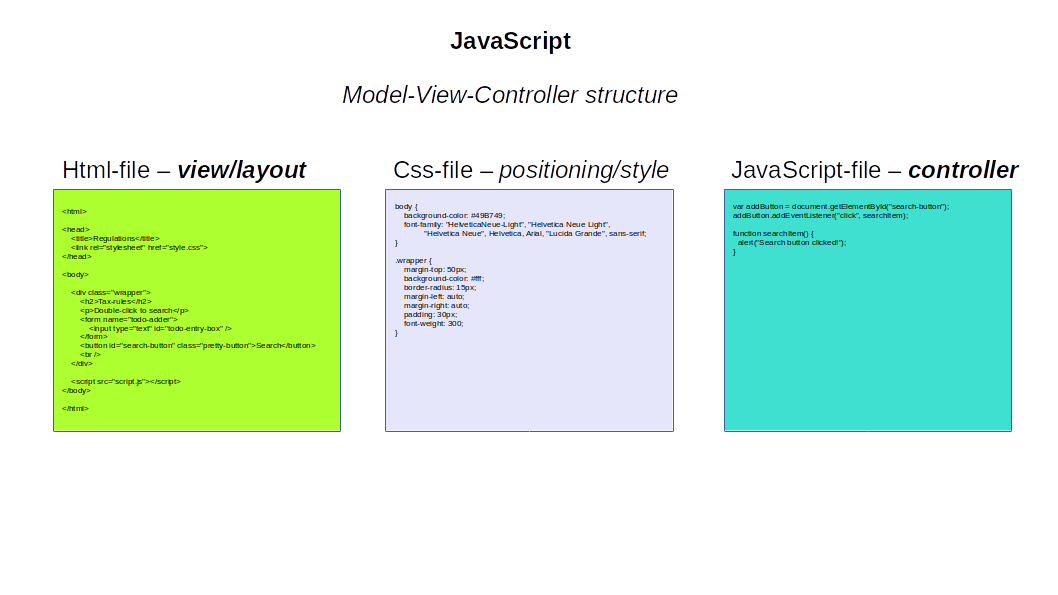
JavaScript
In JavaScript, html-layout is used as a basis. The well-known html-tags appear in the view/layout file, left in the figure below.
The responsive logic of the JavaScript page is programmed in the JavaScript Controller, right in the figure below.
The CSS-file, center, customizes the default view of the web-page, with positioning settings, margin widths, padding and various other style settings.
Html-file
The html-file in the figure above, has the following program-code:
<html>

<head>
  <title>Regulations</title>
  <link rel="stylesheet" href="style.css">
</head>

<body>

  <div class="wrapper">
    <h2>Tax-rules</h2>
    <p>Double-click to search</p>
    <form name="todo-adder">
      <input type="text" id="todo-entry-box" />
    </form>
    <button id="search-button" class="pretty-button">Search</button>
  <br />
  </div>

  <script src="script.js"></script>

</body>

</html>
The html-file links to the CSS-file using the ‘<link rel=…’ line.
The html-file links to the JavaScript file via the ‘<script scr=…’ line.
CSS-file
The CSS-file looks as follows
body {
background-color: #49B749;
font-family: "HelveticaNeue-Light", "Helvetica Neue Light", "Helvetica Neue", Helvetica, Arial, "Lucida Grande", sans-serif;
}

.wrapper {
margin-top: 50px;
background-color: #fff;
border-radius: 15px;
margin-left: auto;
margin-right: auto;
padding: 30px;
font-weight: 300;
}

.todo-wrapper h2 {
margin: 0;
}

.todo-wrapper p {
font-style: italic;
color: #666;
margin: 5px 0;
}

.todo-wrapper ol {
margin: 20px 0;
}

.todo-wrapper ol li {
margin: 5px 0;
padding: 3px;
-webkit-user-select: none;
-moz-user-select: none;
-ms-user-select: none;
user-select: none;
-webkit-transition: all 0.5s ease-out;
transition: all 0.5s ease-out;
}

.todo-wrapper ol li:nth-child(even) {
background: #ddd;
}

.todo-wrapper .completed {
text-decoration: line-through;
color: #666;
}

.todo-wrapper .pretty-button {
margin: 10px 2px;
padding: 5px 20px;
border-radius: 15px;
background-color: #0093D5;
border: none;
color: #fff;
text-align: center;
display: inline-block;
font-size: small;
}

.todo-wrapper .pretty-button:hover {
cursor: pointer;
opacity: 0.75;
}

.todo-wrapper input {
padding: 3px 6px;
}

.todo-wrapper form {
display: inline-block;
}

#control-wrapper {
text-align: center;
display: flex;
flex-wrap: wrap;
justify-content: space-around;
}

.todo-wrapper #clear-button {
background-color: #49B749;
}

.todo-wrapper #empty-button {
background-color: #9B1C20;
}

.todo-wrapper #save-button {
background-color: #49B749;
}

@media only screen and (min-width: 1400px) {
.todo-wrapper {
width: 50%;
}

.todo-wrapper input {
width: 600px;
}

}

@media only screen and (max-width: 1399px) and (min-width: 750px) {
.todo-wrapper {
width: 75%;
}

.todo-wrapper input {
width: 400px;
}
}
JavaScript-file
Finally, the JavaScript file looks as depicted hereunder
var searchButton = document.getElementById("search-button");
searchButton.addEventListener("click", searchItem);

function searchItem() {
   alert("Search button clicked!");
}
These three files (the html-file, the css-file and the javascript-file) together implement the JavaScript front-end, according to the MVC-pattern.
The working JavaScript page can be tested via the following link: JavaScript screen – click here
Scaled Vector Graphics (SVG) in Html
Modern html browsers have built support for scaled vector graphics. You can draw all kinds of simple figures in SVG (circles, rectangles, poly-lines, a [filled] polygon), and SVG also includes special features such as blurring and gradient fill. See the following examples of SVG-usage.
Forms in JavaScript
It is relatively easy to construct a form page in JavaScript.
See the clear tutorial on JavaScript forms here.
Angular
Based on the experiences with JavaScript, the type-strong language TypeScript was developed. In parallel, the front-end framework Angular was designed, and launched. Initially, Angular was a mere extension to JavaScript but from Angular 2+ onwards, it has become a framework of its own. Directives, imposed design patterns, integration of TypeScript – all these features come with Angular.
Angular also implements the model-view-controller design.
An Angular application contains at least one html-page (View), which defines the layout of the webpage. Below, this page is index.html.
The application contains at least one TypeScript page (Controller), which holds the main procedural actions.
The file styles.scss contains the web-styling, similar to the CSS-file in a JavaScript screen.

As can be seen, an Angular application has a specific file-layout.
The general software design of an Angular 2+ application, looks as follows:

The entrance point is the html-page, which contains the basic web-layout of the page displayed in your browser.
The Angular application contains:
- HTML-pages (Views in the MVC pattern)
- @Component TypeScript code files (an @Component is the Controller in the MVC-pattern)
- TypeScript Classes defined by the keyword Class (the Model part of the MVC-pattern)
- @Injectable Sevices, which are called by the @Components (for example, Http-requests to a Java-backend will be handled by a service)
- HttpInterceptor – Intercepts and handles an HttpRequest or HttpResponse.
Earlier software design of an Angular 1.5 application can be seen hereunder:

A major difference is the absence of the TypeScript language, in AngularJS.
The view in Angular 1.5 corresponds with the (template) HTML-page in Angular 2+. The contoller in AngularJS corresponds to a component in Angular 2+.
From JavaScript to TypeScript
JavaScript does not contain Object Orientation, strong type checking and compile-time error checks. This prevents JavaScript from proper code reusage and modularization. TypeScript was developed to include just these long wanted-for features.
TypeScript language
The TypeScript language has been developed as a fully fledged imperative programming language. The prefix ‘Type’ indicates the strong type-safeness of this language, which contrasts the freely typed JavaScript. Moverover, TypeScript contains class inheritance, just like Java does. TypeScript is compiled into JavaScript by the JIT-compiler.
What does TypeScript offer, on top of JavaScript?
- Class definitions, which can be reused throughout the TS-code,
- Class inheritance (single class inheritance), where properties and functions are accessible and callable from child-classes, as well as in the main code,
- Strong typing, such that mixing up types results in compilation errors from the JIT-compiler,
- Enum-variables (such as the days of the week, ‘Monday‘, ‘Tuesday‘, etc.),
- Distinction between instance and static variables,
- Import statements
A few examples of TypeScript code, showing its strengths:
import { User } from 'mypath';
which imports the type declaration User from the CLI-path, specified between single quotes.
Class declaration, with private variable, and a constructor:
export class UserService {

  private usersUrl: string;

  constructor() {
    this.usersUrl = 'http://localhost:8080/users';
  }
...
So, the word constructor is reserved in TypeScript, as are also the words export and class.
Any declaration (such as a variable, function, class, type alias, or interface) can be exported by adding the export keyword.
A more rich class in Typescript is
class UserServiceLarge {

  private usersUrl: string;

  constructor(userUrl:string) {
      this.usersUrl = usersUrl;
  }

  resetUrl:void {
      this.usersUrl = "";
  }

  getUrl:string {
    return usersUrl;
  }

}
which has a parametrized constructor, and two member functions.
class CompanyUserServiceLarge extends UserServiceLarge {

  private companyUserName: string;

  getCompanyUserName:string {
    return companyUserName;
  }

  setCompanyUserName(newUsername:string) {
    this.companyUserName = newUsername;
  }

}
Another newer construct is the let statement:
let locallyScopedString = "Hello let variable!";
Borrowed from mathematics, the let-statements mimics state-safe immutable declarations, but they don’t work that way.
On the contrary, the const statement is 100% state-safe:
const constantString = "Hello const variable!";
Needless to say, const assignments are by definition immutable. Nonetheless, when the variable assigned is a complex type (such as a key-value mapping), the individual elements can be altered.
const account =
  {
    name: "Janssen",
    number: "0127-7789-2398"
  }


// Error
account =
  {
    name: "Rutte",
    number: "9876-8734-1092"
  };


// OK
account.name = "Rutte";
account.name = "Pechtold";
So TypeScript contains complex variable assignment constructs.
Also the popular lambda-expressions can be programmed in TypeScript:
var account = {
    name: "Harrison",
    status: "Ok",
    getStatus: ()=>{ return status }
};
TypeScript contains the following complete set of reserved words:
any
as
break
case
catch
const
continue
do
else
enum
export
extends
false
finally
for
function
get
if
implements
in
instanceof
interface
let
module
new
new
null
number
package
private
public
return
static
string
super
switch
this
throw
true
try
type
typeof
var
void
while
yield
A limited list of keywords to be programmed with.
Angular – useful components
Angular applications are programmed in the TypeScript programming language. The CLI Angular framework contains a number of framework-components. Connection with a Rest-backend, route navigation between webpages, and general Angular core annotation are required elements of an Angular Application.
The Rest-connections can take place using the HttpClient class in Angular.
HttpClient – Angular
The HttpClient is part of the common/http library and facilitates communication with Rest-endpoints.
It contains the following operations:
- request – a request which interprets the body as an `ArrayBuffer` and returns it
- delete – a DELETE request which interprets the body as an `ArrayBuffer` and returns it
- get – a GET request which interprets the body as an `ArrayBuffer` and returns it
- head – a HEAD request which interprets the body as an `ArrayBuffer` and returns it
- jsonp – a JSONP request for the given URL and name of the callback parameter
- options – an OPTIONS request which interprets the body as an `ArrayBuffer` and returns it
- patch – a PATCH request which interprets the body as an `ArrayBuffer` and returns it
- post – a POST request which interprets the body as an `ArrayBuffer` and returns it
- put – a PUT request which interprets the body as an `ArrayBuffer` and returns it
- (constructor)
Take as example the Post-call.
Define the following Json-class:
export class User {
    id: string;
    name: string;
    email: string;
}

user: User;
for a user of a web-application.
The Post-call from Angular looks as follows:
this.http.post<User>(this.usersUrl, user);
with
http: HttpClient;
Angular navigation – via Router
Jumping from one web-page to the next can in Angular be handled by Router, located in @angular/router.
The syntax looks as follows
router.navigate(['/users']);
which leads the user to the webpage with the url-extension ‘users‘.
The proper import statement for Router is
import { Router } from '@angular/router';
For more information on Router, see router – Angular.
Example of Router with IONIC, see ionic-router-example.
Angular – RX – Reactive
Some operations in the front-end can be lengthy in time. Naivation via the Angular router is one such operation. The usage of RXJS – reactive JavaScript – has gained in popularity in order to make more efficient use of the IT resources. An example of using RXJS, is to define the call to an Angular Service as Observable. Here ‘Observable’ is the basic class in the RXJS-framework.
We give the following example. Let an Angular component call an Angular service
this.backendConnectService.getInfo(this.model.parameter)
    .subscribe(resp => {
            this.router.navigate([resp.nextPage]);
        },
        errResponse => {
              this.errMsg = 'Routing to nextPage went wrong';
          }
        }
    );
and in the backendConnectService, the ‘Observable’
export class BackendConnectService {

    constructor (
        private router:Router
    ) {}

    getInfo(parameter:string): Observable<any> {
        router.navigate(['/users']);
    }
The usesage of ‘Observable’ decouples the component request from the service call to tbe backend. This is the reactive coding style.
Angular – Forms
An extensive forms-package is available in Angular.
Three types of forms-APIs are available:
- Reactive forms: Reactive forms provide a model-driven approach to handling form inputs whose values change over time. Reactive forms use an explicit and immutable approach to managing the state of a form at a given point in time. Each change to the form state returns a new state, which maintains the integrity of the model between changes. Reactive forms are built around observable streams, where form inputs and values are provided as streams of input values, which can be accessed synchronously.
- Template-driven forms: Template driven forms are simple forms which can be used to develop forms. These are called template-driven as everything that we are going to use in the application is defined in the template that we are defining along with the component.
- Dynamic forms: Dynamic forms is a pattern (not another API) in which you build a form based on meta description.
Import:
import { FormBuilder } from '@angular/forms';How to work with forms, in Angular.
A more extensive form tutorial can be found here.
Angular – @Decorators
A whole framework is not only available to the developer, but also imposed upon when developing Angular applications. Such applications consist of components, services and, at a higher level modules.
Angular 6+ defines a number of framework-decorators, which need to be used in a working Angular application. We explain the usage of essential decorator labels.
@Component – A component controls a section of a screen called a view. The @Component decorator identifies the class immediately below it as a component class, and specifies its metadata. The metadata for a component tells Angular where to get the major building blocks that it needs to create and present the component, and its view.
When a component is instantiated, Angular creates a change detector, which is responsible for propagating the component’s bindings. These bindings can include the selector, the templateUrl and the styleUrls, and more.
@Component({
  selector: 'app-starter',
  templateUrl: './starting.component.html',
  styleUrls: ['./starting.component.scss']
})
That is, the component (.ts, TypeScript file) is linked to the html-template file and the CSS-style file belonging to that screen, using these directives.
Selector: The CSS selector that identifies this directive in a template, and calls instantiation of the directive.
The decorator @Component needs to be imported,
import { Component } from '@angular/core';
@Pipe – Defines a custom modifier, for a (string) variable. Is subsequently used in pipe-expressions throughout the TypeScript code.
@Input() – Decorator that marks a class field as an input property and supplies configuration metadata. The input property is bound to a DOM property in the template. During change detection, Angular automatically updates the data property with the DOM property’s value.
@HostListener – Decorator that declares a DOM event to listen for, and provides a handler method to run when that event occurs.
@Injectable() – Decorator that marks a class as available to be provided and injected as a dependency. Typically, a Service has the decorator @Injectable() preceding its class definition. The decorator @Injectable needs to be imported,
import { Injectable } from '@angular/core';
@NgModule – Decorator that marks a class as an NgModule and supplies configuration metadata. This Decorator allows you to create a module. A module in angular consists of components or other module’s components.
@NgModule has as (most used) parameters:
- imports: a list of the other modules it uses,
- declarations: a list of its components, inside this module,
- bootstrap: the bootstrapped components – the set of components that are bootstrapped when this module is bootstrapped. The components listed here are automatically added to entryComponents.
@ngOnInit – A lifecycle decorator that preceeds TypeScript code (a method) that needs to be called after Angular has initialized all data-bound properties of a directive. Define an ngOnInit() method to handle any additional initialization tasks.